Setting Up Your Computer and M0/M4!
Please Read!
This guide should apply to everyone on a modern operating system (Windows, MacOS, most modern Linux distros).
Also, if I refer to a script, I am most likely referring to a Python program that will run on your computer/laptop. If I refer to a sketch, I am most likely referring to an Arduino program that will run on your MCU.
Regarding the lab's CentOS computer! CentOS 7 is simply too old to support the necessary versions of Python, and is EOL. As such, I will wait until the new IRIS laptop is set up before I update this section.
Tip
Since I primarily use Linux, I will refer to Terminal, cmd, PowerShell, and whatever other analogous app as “terminal”. For Windows users, if you see a command run as
sudoin the guide below, you will have to run that same command (without includingsudo) in an elevated/administrator cmd or PowerShell window.
Python/pip is Unrecognized?
Sometimes, trying to run the
pythoncommand in terminal will throw an error saying it’s an unrecognized command. Alternatives that usually work are:
pythonpython3pypy3and for
pip:
pippip3If none of these work, chances are you do not have Python installed properly.
Arduino IDE says my device is unrecognized!
Sometimes, our sketches “lock” the board in a way that’s not always recoverable from our computer. A simple fix is to rapidly double click the little black reset button on your MCU. This will switch the MCU into bootloader mode, which conveniently halts the currently running sketch until a new one is uploaded. Make sure to reselect your MCU port! You can now try uploading your sketch again.
Arduino IDE hangs forever or fails after a while when I'm uploading a sketch!
See “Arduino IDE says my device is unrecognized!”
General Requirements
- Arduino IDE 2.3+
- Legacy IDE (1.8.X) should work, but the GUI is different and you will have to find the analogous menus.
- Python 3.10+
- Ideally 3.12+
- Please double check your Python version by running
python --versionin terminal!
- A Local Copy of our Code
- Here is a link to the zip.
- If you use this link, make sure you extract the contents somewhere memorable before moving on.
- Here is a link to the zip.
Arduino IDE
The bare IDE will not recognize our microcontrollers (MCUs) without some set up.
- Open Arduino IDE.
- Go to File→Preferences
- At the bottom, there will be an empty text box titled “Additional boards manager URLS”. Paste in the following:
https://adafruit.github.io/arduino-board-index/package_adafruit_index.json
- …and click OK.
- Next, in the left sidebar, open the Boards Manager.
- Search for and install Adafruit SAMD Boards.
- This will install the proper dependencies for our MCUs.
Validating Your Setup!
Now we’ll run a test program on your MCU to make sure the basics are set up properly. Make sure your MCU is plugged into your computer before proceeding.
- In Arduino IDE, go to File→Examples→Basics→Blink. This should look something like this:
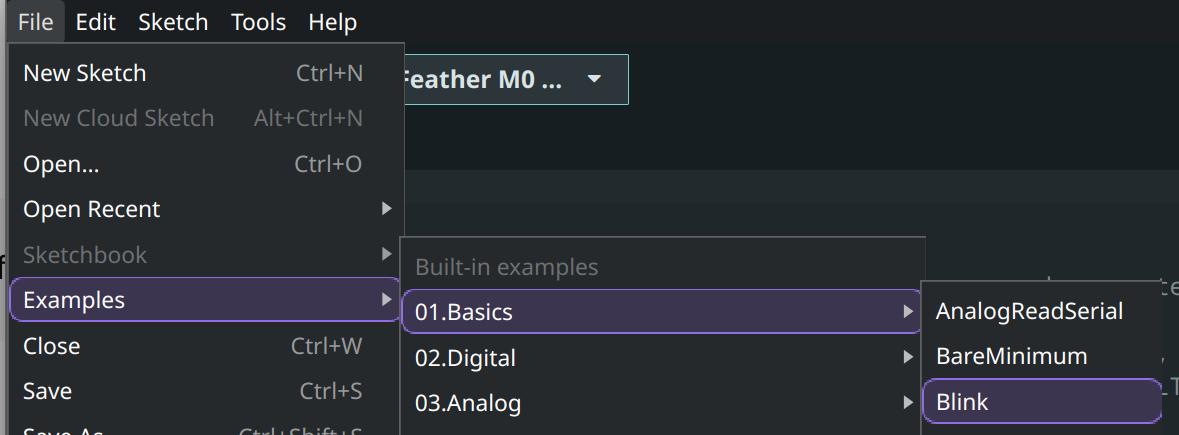
- This will open a new window with the Blink example sketch.
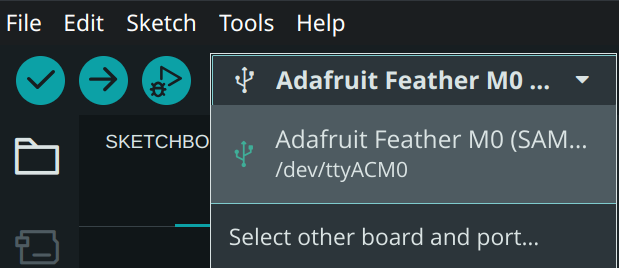
- In Arduino IDE, you should see a dropdown menu in the top left that looks something like this:
- Windows users will see ports such as
COM6orCOM4 - Mac users will see ports such as
/dev/cu.usbmodem1101- You may see a pop up to install xcrun. Allow the install to finish before proceeding.
- Linux users will see ports such as
/dev/ttyACM0
- If your setup is correct, you should see an entry in there for every connected MCU. Select the one you’d like to test.
- Click the → button in the top left to compile and upload the example sketch onto your MCU!
- Once the upload is complete, you should see a small LED on your MCU start blinking near the USB port. If everything so far has worked, then you should be good to go!

Using the All-In-One Serial Importer Script!
Dependencies
Acknowledging VENVs
I know this isn’t quite the cleanest way of handling our dependencies. Once I’ve cleaned up the current GitHub repository more, I will work on updating all relevant scripts to work with Python’s virtual environments.
The Code
Please make sure you are looking at the serial_log_binary branch found here!
- The script can be found at:
IRIS-Project/analysis/scripts/serial_importer_all_in_one/serial_importer_all_in_one.py. - You will find the sketch at:
IRIS-Project/packages/serial_log.- You need all three files in here. Not just
serial_log.ino
- You need all three files in here. Not just
Python
matplotlib- In terminal, run the following depending on your OS:
- Should work for most:
pip install matplotlib - If your version of python came from your Linux distro’s package manager:
- Debian/Ubuntu:
sudo apt-get install python3-matplotlib - Fedora:
sudo dnf install python3-matplotlib - Red Hat:
sudo yum install python3-matplotlib - Arch:
sudo pacman -S python-matplotlib
- Debian/Ubuntu:
- Should work for most:
- In terminal, run the following depending on your OS:
pyserial- In terminal, run the following depending on your OS:
- Should work for most: `pip install pyserial
- If your version of python came from your Linux distro’s package manager:
- Debian/Ubuntu:
sudo apt-get install python3-serial - Fedora:
sudo dnf install python3-serial - Red Hat: `sudo yum install python3-serial
- Arch: `sudo pacman -S python-serial
- Debian/Ubuntu:
- In terminal, run the following depending on your OS:
Arduino
- MCU: Adafruit Feather M0 or Adafruit Feather M4
- No special libraries required
MCU Setup
- Open
serial_log.inousing Arduino IDE, or open Arduino IDE first and go to File→Open… to openserial_log.ino.- You may see a new IDE window open with the sketch opened.
- Use the dropdown menu to select your MCU:
- Make note of the listed port!
- In this case, the MCU is connected to serial port
/dev/ttyACM0
- In this case, the MCU is connected to serial port
- Click the → button in the top left to compile and upload the sketch. Wait for it to complete.
- The MCU should now be ready for use in conjunction with the script.
Running the Script!
- Open a terminal window in the script’s directory, or
cdinto it as needed. - Run
python ./serial_importer_all_in_one.pyto see the general help message. Please read this to get a better understanding of the functionality provided.- The help message may tell you to use
./import_serial_binary.pyinstead of./serial_importer_all_in_one.py. Don’t listen to it :) - Note that the
-lflag may not work properly on Linux devices. Refer back to Step 2 of the MCU Setup section above to find the proper port.
- The help message may tell you to use
- Once you’re ready, try running
python serial_importer_all_in_one.py --plot port=<port for M0> baud=9600 hz=50 sec=10to see the live plotter. Type out the same port you used in the Arduino IDE.- 50 points per second
- 10 second time window
General Script Info
Voltage in the live plot graph is presented as a value in the range [0,4095] as our ADC takes 12-bit readings. To convert to the real voltage:
Voltages from the live printer are presented as a value in the range [0,65520] as this is the sum of 16 12-bit readings. To convert to the real voltage:
Live Plotter
- Currently the live plotter only reads from pins A0 and A1
- Flexible inputs are a WIP for now!
- The live plotter has a max visual refresh rate of 30hz for performance reasons, but data will be collected at the specified rate
- The Pan Tool can be used to move vertically
- The Zoom Tool can be used to scale vertically
- Hitting “r” on your keyboard will reset to default view/scaling
- The live plotter is a bit buggy! You may notice:
- Overlapping plots
- Use the pan tool to move the window around.
- If that alone doesn’t work, try hitting r.
- Overlapping plots
Saving Data
- If the
--saveor-sflag is used, indicating readings should be saved, the script will begin saving binary files into the./data/directory located in the script’s parent directory.- WIP: a CLI flag to allow custom save directories